Deploying VMware VSAN 6.2 with vCenter Integrated - Part 1
Part 1 - Architecture, Prep & Cluster Deployment (you are here)
Part 2 - vCenter Deployment and Configuration
Part 3 - Network Configuration
Part 4 - Troubleshooting: things that can go wrong

Deploying VMware Virtual SAN (VSAN) into a greenfield environment can be done a couple of ways. The easiest of which would be to deploy a vCenter Server first on separate infrastructure, deploy the ESXi hosts and then build the cluster. But what if you want to deploy vCenter such that is resides on the shared datastore you intend to create with VSAN and live within the supporting hosts? This is called bootstrapping vCenter within VSAN and was previously covered by William Lam for a single node deployment on vSphere 5.5. The concept is similar here but I'll be deploying a full 3-node cluster, using vSphere 6.2 and configuring a two disk group hybrid config. VSAN being a kernel-level service within ESXi can be configured without vCenter on a single node. vCenter of course is required for multi-node clustering, licensing and management of the HA cluster, but the value here is that we can deploy VSAN first, then add vCenter to the newly created VSAN datastore without having to move things around after the fact.
Architecture
The basic tenets of the VSAN architecture are relatively simple: an ESXi kernel-level service enabled via VMK port, managed by vCenter, running on each node in a cluster whom contribute local disks to form a distributed datastore, accessible entirely via the network that connects them. VSAN uses the concept of Disk Groups (DG) to organize storage which are a collection of cache and capacity devices that can be all flash or a mix of flash and spinning disk (hybrid). One cache device is allowed per DG and I strongly recommend using at least 2 x DGs for resiliency as well as increased performance in all configurations. Caching behavior differs depending on the model deployed, hybrid uses 30% of the cache device for writes while all flash dedicates 100% of the cache device to writes. The basic rule of VSAN sizing is that cache should be sized based on 10% of anticipated consumed capacity (in VMDKs) before failures tolerated are considered. In other words, make sure your cache SSD is big enough to handle the capacity disks you put behind it, by at least 10%, per disk group. 10Gb networking is recommended and required for all flash configurations.
Policy plays an important role in VSAN which provides a great deal of configurability but also dictates the most important single policy element: Failures To Tolerate (FTT). FTT defaults to a value of 1 which means that every VM will have one replica of its data across the cluster. The maximum value is 3 but each replica created has an impact on available usable disk capacity, plan accordingly.
For more in-depth info and some light bedtime reading, check out the very good Virtual SAN 6.2 Design Guide.
My Environment:
- 3 x PowerEdge R720xd
- 2 x E5-2650v2 CPUs
- 384GB RAM
- 2 x 160GB SSDs (Boot)
- 2 x 400GB SSDs (Caching)
- 4 x 1TB HDDs (Capacity)
- 2 x 10Gb NICs
- vSphere 6 Update 2
- ESXi 6.0.0, 3620759
- vCenter Server 6.0 Update 2 Appliance
Here is the architecture of the cluster I will deploy via this exercise. Even though I'm using 12G PowerEdge servers here, these steps should be very similar on 13G platforms.

Prep
Very important, make sure all applicable hardware components are on the VMware VSAN Certified List! First make sure that all the disks to be used in the VSAN cluster are in non-RAID pass-through mode, assuming your storage controller supports this. If using a supported Dell PERC controller, this should be the default. Conversion of each disk may be necessary if rebuilding from a previous configuration which is performed on the PD Mgmt tab.

If you don't see the option to "convert to non-RAID", first select the "Factory Default" option on the Ctrl Mgmt tab. You should then be able to convert all disks to non-RAID if required or they will default to this. Repeat this process on all hosts.

Install ESXi 6 on each node and enable the ESXi Shell or SSH, whichever you prefer, via the Troubleshooting Options menu of the Direct Console. Enter Alt+F1 at the home screen of the Direct Console UI to log into the ESXi Shell, to exit the ESXi Shell, press Alt+F2.

Verify that the disks intended to be used for VSAN are visible to the host and take note of the device names (naa.xx) as you will need these in a moment to build the DG. Below you can see the devices from the host client as well as within ESXi Shell running the command:
esxcli storage core device list
If using pass-through disks, the disks should be properly identified as SSD or HDD with a slew of additional information available. If using RAID0 disks, much less information will be visible here.

By default the VSAN policy should be set at a host Failure To Tolerate (FTT) of 1 for all classes with force provisioning set on vswap and vmem. This policy is present on a fresh ESXi host with no vCenter management. Force provisioning allows VSAN to violate the FTT policy which we need when building out this initial cluster on a single node, so we need to add this policy value to vdisk and vmnamespace policy classes.
Verify the VSAN policy defaults:
esxcli vsan policy getdefault
Enable force provisioning for vdisk and vmnamespace. Take note of the case sensitivity here, these commands will fail silently if case is incorrect.
esxcli vsan policy setdefault -c vdisk -p "((\"hostFailuresToTolerate\" i1) (\"forceProvisioning\" i1))"esxcli vsan policy setdefault -c vmnamespace -p "((\"hostFailuresToTolerate\" i1) (\"forceProvisioning\" i1))"
Recheck the policy to ensure proper adhesion.

Create the VSAN Cluster
VSAN being a kernel-level service can be created without vCenter even being present. Within the ESXi Shell of your first host, run the following command to create the VSAN cluster:
esxcli vsan cluster new
Verify the details of the new cluster. Note that this host is now the Master node for the VSAN cluster:
esxci vsan cluster get

Once the cluster is created, add each disk to the cluster, note that any capacity disks you add here will go into the same disk group, 1 x SSD per DG. If you intend to create multiple disk groups, only add the disks you want present in the first disk group at this stage. -s signifies SSD and -d signifies HDD. Use multiple -s or -d statements within the command to add multiple disks. For my first disk group I'll be adding 1 x SSD (372GB) and 2 x HDDs (931GB)
esxcli vsan storage add -s naa.xx -d naa.xy -d naa.xz
Once complete, run the following to verify that the disks were added properly and assigned to the correct tier. All disks are designated as capacity or not, cache tier SSDs should report false:
esxcli vsan storage list

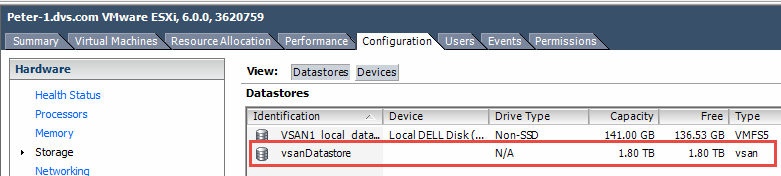
If you connect to this host using the vSphere desktop client you will see the new datastore listed under storage, it will not be visible in the web host client. Notice that the reported VSAN datastore capacity is based on the capacity tier disks only and represents a raw value (2 x 931GB = 1.8TB).
So at this point we have a fully functional baby VSAN deployment running on one node with a three disk hybrid configuration. In the next part we'll look at deploying and configuring vCenter to take this to the next level.
Part 1 - Architecture, Prep & Cluster Deployment (you are here)
Part 2 - vCenter Deployment and Configuration
Part 3 - Network Configuration
Part 4 - Troubleshooting: things that can go wrong
Resources:
Bootstrap vCenter for VSAN 5.5 (Virtually Ghetto)
Enable SSD option on disks not detected as SSDs


No comments: