The Samsung Galaxy S3 Done Right
The Google universe is a wonderful place for the advanced user. It’s a pretty damn good place for the non-advanced user too, with seamless integration of Google products and cloud services across devices. Chrome, search, gmail, maps, calendar, drive, voice…all synced with a consistent experience no matter how you access them. Couple these awesome services with a highly customizable and feature rich mobile OS, and you have an almost unbeatable solution. And to think, I used to only want a phone that was good at being a phone!
Most Android-based devices have the same general problem Windows does on PCs, which is that these platforms are allowed to be mucked with by the OEMs that ultimately sell them (read: wireless carriers). While both Android and Windows are great products when properly implemented, the public perception can be less than ideal due to the OEM’s addition of bloat, trial products, customized UIs and other unnecessary additions or changes that negatively impact the overall user experience.
If you buy into the Google Nexus line of products you will get an unfiltered Google experience as it was meant to be but only if your brand name carrier or MVNO of choice is supported there (GSM). I am one of the lucky few that has an unlimited data plan with what is, in my opinion, the best CDMA/4G network available in the US: Verizon. At the price point my plan is locked at, I’m not giving it up, so sadly no Nexus love for me (yet). No problem, I can take the best selling Android smartphone of all time, the S3, and make it the way it should be.
The Galaxy S3

In default form this phone comes with Android 4.0 (Ice Cream Sandwich), Samsung’s TouchWiz interface and a ton of bloat courtesy of Samsung + Verizon Wireless. There are some interesting, albeit gimmicky, features centered around motion such as pushing the screen and rolling the phone to jump to the camera or holding and moving icons by turning your body. The phone is plenty fast and the 2100mAh battery life is great, even with the stock softs. To truly make this phone great, it needs zero bloat and Android 4.2.2 (Jelly Bean) in a pure Google experience.
Root, ROM, & Recovery
It goes without saying but I’ll say it anyway: I will be in no way responsible for anything bad that happens to you or your device by following this guide. Following any advice or steps written here will be done so at your own risk or peril.
To reach Android nirvana a few things must be done prior, this is the fun part. The S3 has a locked bootloader from the factory so it must be replaced/ unlocked. The stock recovery is also too limited and should be replaced by the defacto-standard and feature rich ClockWordMod recovery (CWM). There are a couple of ways to go about this, one involves the Samsung Odin tool and reverting to a factory image while the other can be used on OTA builds by flashing bootchains. I opted for the first method which is the cleanest in my opinion. The following steps are how I turned my S3 from good to great.
Step 1: Prep
You’ll need to gather a few items before getting started. I’ll explain what each is used for in subsequent steps.
- Download and install the Official Samsung USB drivers on your PC: link
- Download and extract the Samsung Odin v3.07 utility on your PC: link
- Download the stock VRBLK3 factory image with no data wipe (courtesy of open1your1eyes0 on XDA): link
- Grab SuperSU + Unlocked Bootloader: link
- Download CWM touch recovery flashable via Odin: link
- Download Backup/Synergy zip: link
- Download QPST backup/ restore tool: link
- Download the latest Jelly Bean M snapshot from Cyanogenmod (CM 10.1): link
- Download the applicable Google apps for your ROM (this must match!): link
Step 2: Odin the factory image obtained in step 1
To do this you need to first put the phone in download mode then connect it to your PC via USB.
To reboot into ODIN/Download Mode:
- Make sure your device is completely off
- Key Combos: Volume Down + Home
- While holding both of them simultaneously press the Power button until you see a disclaimer on the screen
- Then press Volume Up and Power to accept the disclaimer
- Once the green robot is visible on the screen this indicates that handset is in now ODIN/Download mode
Once in download mode the screen on your phone will look like this:
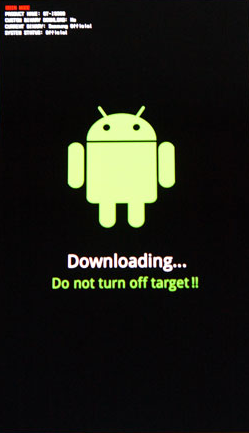
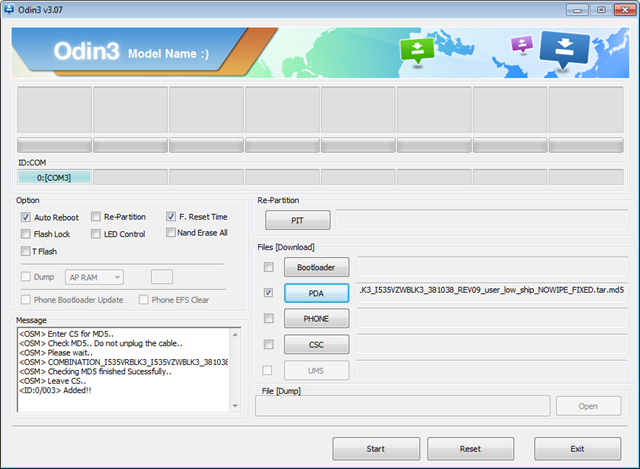
Once your phone is connected to your PC, Odin should recognize it and its assigned COM port. Check the box next to PDA and select the no wipe file. DO NOT check any other boxes here or select a pit file. Under options, only Auto Reboot and F. Reset Time should be selected. When ready, click Start.
Once the flashing is complete the phone will reboot and begin the start up sequence. Before you do anything, reboot immediately to download mode again and flash the CWM recovery.
Step 3: Install custom recovery

Recovery is the pre-boot runtime that allows us to easily take nandroids (full system backups) and ultimately load other ROMs. Reboot into download/Odin mode again following the key combinations above. Using the same Odin method shown above, select the CWM md5 file in the PDA field. Uncheck Auto Reboot under options. Click start when ready. Once finished, disconnect the USB cable, pull the battery and put it back in. If you boot to recovery now, you should see the custom touch enabled CWM recovery, which some complain about but I really like.
To reboot into Recovery Mode:
- Make sure your device is completely off
- Key Combos: Volume Up + Home
- While holding both of them simultaneously press the Power button
- As soon as the phone vibrates, let go of the Power button but keep holding Volume Up + Home
- When you see the "Samsung Galaxy S III" logo (not just the word "Samsung"), right after that, the next screen you should see is your recovery
- Don't let go of Volume Up + Home until you see your recovery
Step 4: Unlock bootloader, Achieve Root
This next step is easiest done in a single fail swoop. Each of these items can be addressed individually if desired but since we’re starting from a factory image here, I‘d like to get both done at once. Now that we have the custom recovery (CWM) in place, we will unlock the phone from there. Reboot to recovery and flash the SuperSU_Bootloader_Fixed.zip. Go ahead and perform a wipe/ factory reset now while you’re still in recovery.
Congrats, the phone is now rooted and unlocked. If you have no desire to flash a custom ROM you can stop here.
Step 5: Backup IMEI
This is purely a precautionary step and one that could save hours of trouble later should anything ever go wrong with your device from flashing ROMs. Now is a good time to perform this step, before you flash your custom ROM. Initially the S3 is supposed to have an IMEI backup (nv data) of the device stored locally should this info ever get wiped from EFS. Some had the unfortunate pleasure of finding this to not be the case after bricking their devices and having to go through an arduous process to rectify things. This procedure will properly backup this IMEI info should it ever need to be replaced.
The easy way to do this is by running a command from the phone in the Terminal emulator:
su
reboot nvbackup
- Reboot to recovery and install the Synergy_Backup_HWKeys_signed.zip. Reboot the phone again.
- Install the QPST utility on your PC and connect your phone via USB.
- Follow the remaining steps in this post to backup your IMEI to your PC for extra safety: link
With a local and external backup of your IMEI, you should feel confident to flash ROMs now that you can restore this critical bit of information if needed.
Step 6: Flash custom ROM

Firstly and very importantly, you need to use ROMs for your specific device! These are not ubiquitous across Verizon, ATT, etc. The device codes for all S3 phones follow the naming standard of d2<carrier>. So in my case since I have a Verizon device it’s d2vzw, an S3 on the ATT network is d2att and so on.
There are other ROMs out there but I am seeking a pure Google experience, so I am going with one of the most respected and highest quality Android developers on the planet: Cyanogenmod. Currently Jelly Bean aka Android 4.2.2 aka Cyanogenmod 10.1 is experimental, there is no “stable” ROM yet. That said there are M snapshots which are monthly culminations so are more stable than nightlies which can be very unpredictable. I have been running cm-10.1-20130304-EXPERIMENTAL-d2vzw-M2.zip for several weeks now with no problems whatsoever.
Download the ROM to the internal or external SD card on the phone, reboot to recovery, install zip. Important to note is that Google Apps are not included in the CM builds so these must be flashed in CWM as well. Do this right after the install of the ROM, before you reboot. Once finished, reboot, walk through the initial setup steps and you’re good to go. JB on the S3 is simple, clean, and fast.
Enable Reboot to Recovery
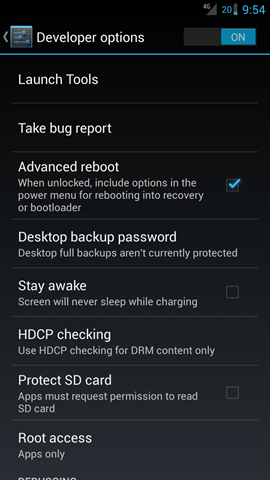
Jelly Bean comes with a few unique changes under the hood from how certain functions worked in previous Android builds. The option to reboot to recovery from the power button menu is notably absent in JB. Developer options are also absent from the system menu which first must be enabled to turn on recovery rebooting. Pains were taken to hide this for some reason.
In the settings menu, go to About Phone and tab the build 7 times. You should see a pop up that developer options are now enabled which will also now be visible in the root of the system menu. Within developer options push the slider to on and check the “advanced reboot” box. Recovery will now be in the power button menu.
Location Services for Maps (GPS or 3G/4G)
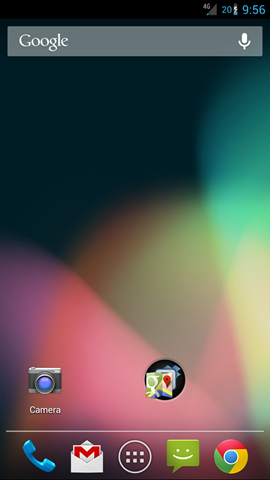
This one was tricky and made far too difficult to enable for no really good reason, other than to get you into Google Now. By default even GPS can’t find your location in Google maps. Before any location services can be used they must be enabled in 2 places. The first is in the expected place within the system menu under location access:

It was frustrating to find that even after enabling location access, maps could still not use location data. The other place this must be enabled is within Google Now which can be accessed by tapping the search bar on the home screen or launching the Google Search app. From Google Now, right click into Settings, choose Privacy & accounts, click Google location settings, push the slider to on to allow Google apps access your location. Huge pain to get here. I mean, wow Google, what the hell??! After enabling, maps should now work correctly.

Other items of interest
Another change I’d recommend to make is install the DNS Changer app from the Play store. I use OpenDNS for DNS resolution which is likely faster than your carrier enabling faster web browsing, but also cuts down on their all but certain spying of URLs from their DNS resolvers.

The notification LED on the S3 is very cool as well for custom alerting. Under Settings, System, Notification light, you can change the LED to different colors based on the type of alert desired. For example I turn the light green for text messages and red for emails. Any color you like, any notification you like. This is an awesome feature.

Another useful feature is Quiet Hours under System Settings, sound. Mute notifications, vibrations etc for a given time period.
JB also offers some native hardware overclocking if you’re so inclined. Extreme care should be taken here of course.


Conclusion
Overall I couldn’t be happier with my S3 running CM10.1. The only weirdness at all that I’ve experienced is vertical scrolling in the app drawer doesn’t work and the home button has forgotten itself a few times by opening the running apps list only. Super minor stuff. Functionally everything else works perfectly on this buttery smooth and snappy interface. There should be another M snap released today or tomorrow which I will install the minute it drops. With the S4 right around the corner and the Android devs lining up to say they won’t support it, I’m very happy to have my well-supported S3. It really doesn’t get much better than this!
References:
XDA: Stock Jelly Bean images
XDA: Root, recovery etc for OTA JB
QPST backup of IMEI
ODIN flashing guide


No comments: