Fun with Wii Hacking
It’s Christmas time, things slow down at work, we take more time off to be with family, what better way to kick back than around the Wii? I’m sure years from now if I finally get a Wii-U I’ll do something similar there but for now this fun applies to the classic Wii only. I’ve been gaming on the XBox360 and PS3 for years and the PC longer than I can remember. My kids are getting old enough now to enjoy this so I decided to finally pick up a Wii + a bunch of games from eBay and create a game juke box, essentially.
It should go without saying but I will be in no way responsible for anything bad that happens to your Wii as a result of this guide. All information contained within is for informational purposes only and provided with no warranty.
Design goals:
- Play Wii games directly from USB drive formatted with NTFS and shared for other purposes.
- Make each game selectable as individual channels directly from Wii home screen.
- Don’t brick the Wii :-)
To pull this off there are a number of things that must be in place:
- SD Card (mine = 512MB) – Stores Homebrew applications and WAD files
- USB drive (mine = 1TB) – Stores games
- Homebrew channel (HBC) – Launch homebrew apps in Wii
- USB Loader – Provides the ability to play games directly from USB storage
- IOS236 - the infamous Trucha bug is ultimately what makes all this possible
- Priiloader – brick protection, blocks system updates, bypasses initial health screen, and more
- Game files as .ISO or .WBFS – either can be used to play games, WBFS files are smaller
- .wad files (forwarders) – Provides shortcuts that live in channels and save execution steps
There are multiple ways to pull this off so the following is how I chose to do it. Other loaders, IOS builds and tools may work just as well but I have no experience outside of what I used in this guide. There will be a lot of moving your SD card back and forth between your PC so an SD reader or capable laptop is essential.
Homebrew Channel
HBC provides an environment used to load applications and is the key to making my plot work. There are a number of HBC versions available depending on preference or the version of your Wii system menu. I have System menu 4.3 so am running LetterBomb. HackMii is used to install the HBC and provides an all-in-one installer to complete this first step. Read more about how to do this and download the needed bits here.
Once successfully installed you should see a new channel in your Wii home screen like this:

When you start the HBC, any Homebrew apps contained within \apps on your SD card will now be executable within the Wii.
Trucha (IOS236)
The Trucha bug, from earlier Wii IOS versions, allows digital signatures from non-Nintendo approved software to be installed and run on the Wii. Nintendo patched this in all subsequent IOS versions. To take advantage of all the goodness Homebrew allows, this bug must be re-introduced into the Wii so that it can be exploited.
First, follow this guide to download and run the NUS downloader. This will give you a .wad file that you will need to copy to the root of the SD card. Online mode should allow this to be downloaded via wifi from within the Wii, but that didn’t work for me so I manually fetched the WAD file.
Next, grab the IOS236 installer and extract the files to the SD card. The “IOS236” directory should be placed within SD:\Apps\. This is where all SD-based apps will go. Launch the HBC and run the IOS236 installer. When asked, point to the WAD file you generated via the NUS downloader.
Towards the end of the install you will be asked if you want to enable support for pirated games. No matter what, say NO here.
cIOS

With IOS236 installed, there are 2 additional custom IOS’ that need to be installed to enable the use of a USB loader. This will install IOS236 to 2 additional slots which also get used. Grab the d2x cIOS v3.1 installer from here and copy out the “d2x-cios-installer” folder to your SD:\apps folder. Put the SD card back in the Wii and turn it on. Launch HBC and start the d2x installer. Select IOS236 as the IOS for installation.
On the next screen there will be 3 areas with moveable values. The first being the d2x version, select the latest (v8). Move down and change the base IOS to 56. Move down and change the IOS slot to 249. Continue to perform the install.
One more to go. For the 2nd round, change the base IOS to 57 and choose slot 250. Continue to perform the install. Exit the application when the IOS files report successful installations.
Here is a good guide from the developer walking through the various options: d2x guide.
USB Loader
Now that the Wii is hacked we can get on with the fun part and enable the pieces necessary to play games. The USB loader has the job of mounting the ISO or WBFS file thus making a game on a USB drive playable. There are a few different loaders that people use, the most popular seem to be Configurable USB Loader (cfg) and GX Loader. I chose cfg as it seems to have more recent development support plus it boasts all the key features I was looking for.
Extract the cfg v70 zip and copy the contents of the \apps directory in the ZIP to the \apps directory on the SD card. Also copy the usb-loader directory to the ROOT of the SD card. This directory contains the bits necessary to download and display game covers within cfg running in the Wii. This is purely optional and I will end up not needing this functionality anyway.
Connect your USB drive to the OUTER port in the back of the Wii (the one on the bottom if laid flat). Fire up HBC again and start cfg. You should now be able to select and play any games you have available. But let’s not stop there.
You can also optionally use a forwarder for cfg which creates a channel on the Wii home screen so you can launch cfg without having to first launch HBC. IOS58 will need to be installed if you want this functionality which can be found here with instructions. The direction I’m heading, however, this is also unnecessary.
Priiloader

Priiloader is an optional safety and system menu modification mechanism that I higher recommend you install. If you ever run into a non NAND-based brick situation (banner brick), Priiloader can save you. It boots before the Wii system menu so can interrupt the native Wii boot sequence and allow you to perform a number of tasks. Priiloader also allows you to hack your system menu and change some of the native features, like removing the opening “press A” health screen. Priiloader is there for me should I ever run into trouble plus I enabled several menu hacks.
Setup of Priiloader is a little trickier than the other apps as this one will ultimately get installed to your Wii’s NAND. First, you need a .ini file containing the appropriate hacks. You can download one for your specific system menu or use the official full collection which is what I did. Nothing needs to be changed manually in the file, we’ll do this in Priiloader in a moment. I had a hard time with Priiloader initially finding my ini file so I copied it to 4 places and named it both “hacks.ini” as well as “hash_hacks.ini”. Some screens seem to indicate that it looks for both naming conventions. Copy 1 of each to the SD root as well as to \apps\priiloader on the SD card. It should be found now. :)
Extract the Priiloader app bits to \apps on the SD card, launch HBC and install Priiloader. My ini file was not found during the install so I had to select it later at boot time.
To run and configure Priiloader, power on the Wii while holding the reset button. You will see a screen similar to this:

If your hacks ini file was not found during install for whatever reason, select “load/install file” from this menu. It should then be read. You’ll know you are successful if you can select the “system menu hacks” option and configure the options, mine are shown below:
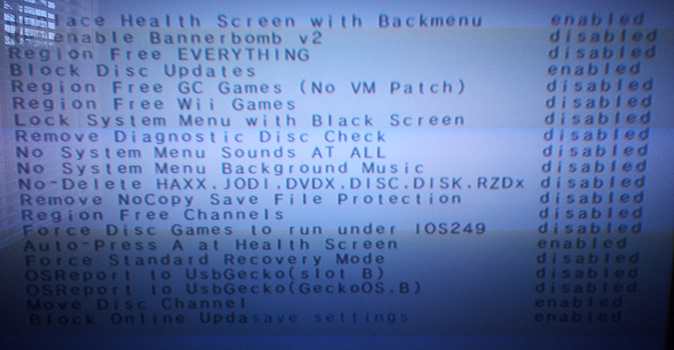
It’s very important to minimally block system and game updates as these will remove IOS236 and destroy all your hard work.
Drives
There are several methods of formatting drives for the Wii with some older methods that include complicated partitioning. The whole point of this exercise for me is that I want to use an existing NTFS drive that I use for other things. I’m not interested in FAT32 or partitioning a dedicated section to be WBFS. These are old school techniques that are no longer necessary! Keep in mind that if you do use FAT32, the maximum supported file size is 4GB so larger games will need to be split up via Wii Backup Manager. Remember to ALWAYS connect your USB drive to the outer USB port on the Wii (the one on the bottom when laid flat).
I also use a very tiny SD card (512MB) that is formatted FAT32. I only use it to store application files which are very tiny and with all this have only consumed ~30MB. Be careful if you use cfg to download cover art as by default it will save everything to your SD card. Again, the method I’m deploying here has no need for cover art that would be displayed in cfg.
Games
Time to get your games ready. You can install your games from disk directly within cfg or rip them to ISO from your PC. Either method works so one way or another get your games into the ISO format. From this point you can simply play your games as ISOs from cfg which is fully supported. Optionally you can transfer a Wii Backup File System (WBFS) file out of the ISO as these consume far less disk space than the full ISO. New Super Mario Bros is 100MB in WBFS vs the 4GB ISO, for example. Either way is fine just put all the game files you intend to use in \wbfs on your USB drive. Very important to have that directory in lower case as cfg will not read it otherwise if your drive is formatted NTFS.
The titles of your ISO/WBFS files is also important as cfg is picky with regard to how you name them. The title of the ISO/WBFS itself should only include the game ID, i.e. RE03N1.wbfs. It’s parent folder can be named a few different ways but it’s safe and easy to go with “game title [game ID]”, with the game ID in brackets. This is detailed in the Q&A portion of the cfg guide.
To generate WBFS or ISO files from your game media, Wii Backup Manager is an excellent tool to use. It can read and write both file formats as well as download cover art if you desire. It can also split your game files if you are using FAT32 on your USB drive.
Forwarders (WAD files)
The last step to pull of my plan is to create WAD files for each of my games. Each WAD will be installed as a channel and will launch the game directly using cfg and HBC behind the scenes. It’s completely transparent and removes the requirement to manually launch cfg or HBC.
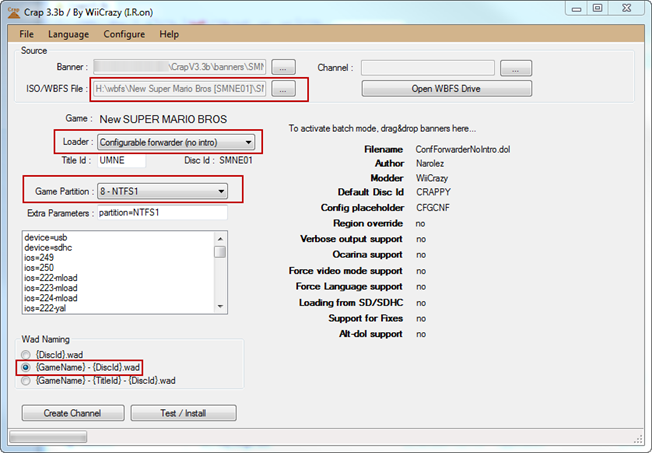
To do this you need a tool called Wiicrazy Crap. Awesome name. There was a newer, renamed version of this called Wii Game Shortcut Creator (WiiGSC) that never left beta as far as I can see. Crap v3.3 requires .NET frameworks and executes directly from the directory structure while WiiGSC does not require .NET and can be installed. Both do essentially the same thing but I used Crap to create my WADs.
Plug your USB drive with your game files into your PC and fire up Crap. There are a lot of options here but you really only need to do 4 things. Choose your ISO/WBFS file, select your loader, select the game partition where the games live and the choose the WAD naming convention. Next click “create channel”. Below is how I created all of my WADs.
Once successful, navigate to the \wad directory within the crapv3.3b folder structure to retrieve your WADs. Copy these to SD:\wad. All that’s left now is to install your WADs.
Multi Mod Manager (MMM)
MMM is the self described Wii Swiss army knife and provides many useful tools but I use it primarily to install WAD files. To install MMM, just like the other HBC apps, extract the folder within \apps to \apps on the SD card and launch from within HBC.
At this point, when MMM loads it will likely default to using IOS58 if you installed it for the cfg forwarder. The first thing you need to check EVERY time you load MMM is that IOS249 is loaded at the bottom. If it isn’t loaded, select IOS249 from “Load another IOS” and MMM will reload with the hacked IOS. Things will not work correctly otherwise.
You can also install a forwarder channel for MMM so you can access it directly from the Wii home screen. Extract and install the MMM Forwarder DFM1 from within MMM.

Launch MMM, scroll down to “WAD Manager” and launch it. It will read all .wad files within SD:\wad. You can now individually install these files or press + next to each one you want for a batch install. Once successful, you should see a new channel for each game on your Wii home screen. The full animated banner is contained within the channel which provides a very nice effect. Each game is now selectable directly from the Wii home screen which launches the game. No more messing with HBC or game disks and my kids will be able to play whatever they want without help. Below is how this looks now:

Mission accomplished! While not a terribly difficult hack, it has a lot of steps to get to the end result. There is a lot of very old information out there in various forums as the Wii has been around since 2006 so be careful. Everything that I’ve outlined here was used to achieve this goal for me and was done with absolutely no adverse issues. Have fun and merry xmas!
References:


Yes! Finally something about wii.
ReplyDeleteMy page - getlivecodes.com
I really enjoy simply reading all of your weblogs. Simply wanted to inform you that you have people like me who appreciate your work. Definitely a great post. Hats off to you! The information that you have provided is very helpful.
ReplyDelete